
Quick & Easy Recipes for Everyday Cooks
Welcome to Food By Ayaka!
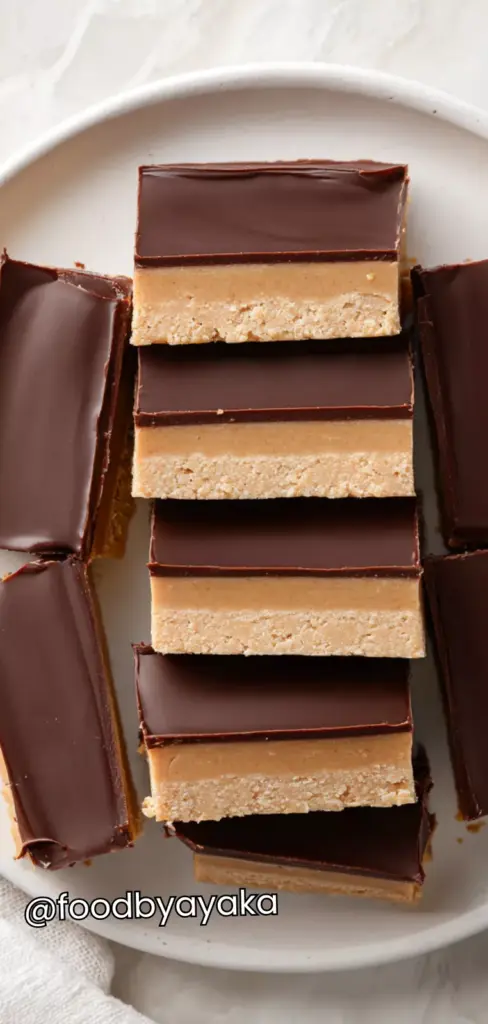
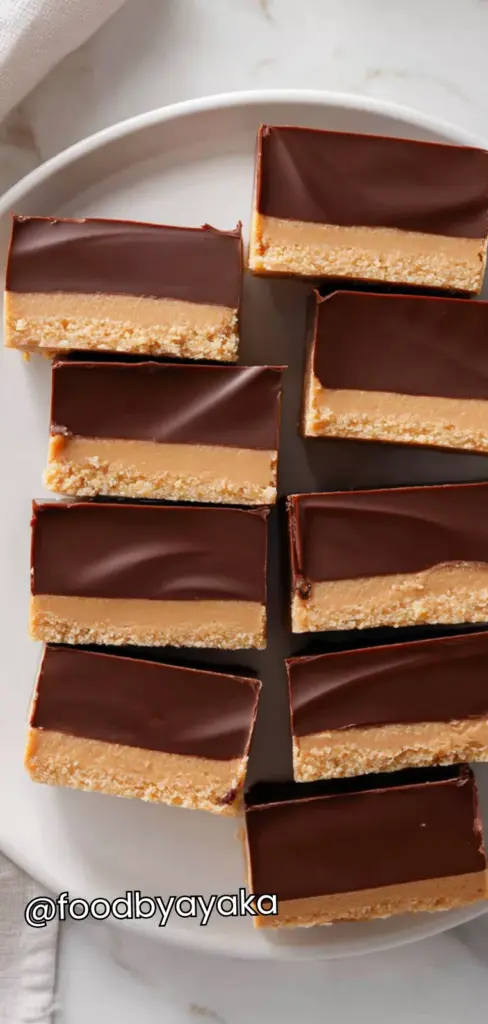
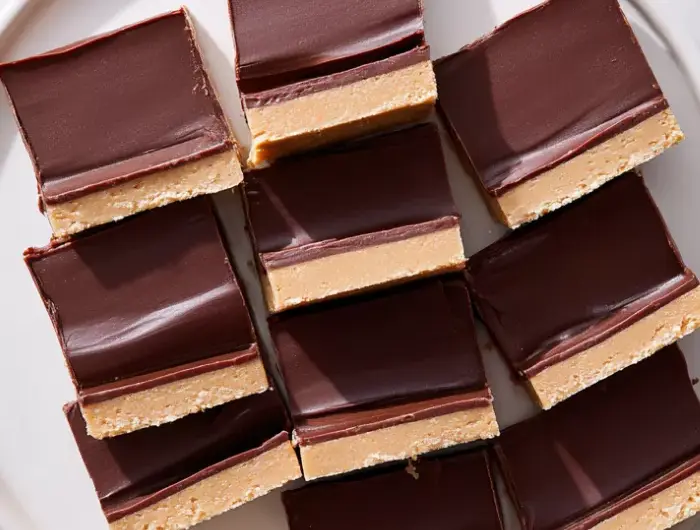
No-Bake Reese’s Peanut Butter Bars Recipe
I love easy desserts, but sometimes baking can feel time-consuming, and this recipe is perfect because it is quick, simple, and still gives a rich homemade flavor. No-Bake Reese’s Peanut Butter Bars are rich, sweet dessert bars made with a creamy peanut butter base and a smooth chocolate topping. They are simple, quick, and do not require an oven. This makes them perfect for busy days when you want something homemade without much effort. The layers are soft, sweet, and satisfying, creating a treat that both kids and adults enjoy.
This recipe is great for parties, holidays, school events, or family gatherings. Because it is no-bake, even beginners can make it successfully. With just a few ingredients and simple steps, you can create beautiful dessert bars that look impressive and taste delicious.
I have always preferred desserts that do not need complicated steps, so I use basic pantry ingredients, and I always prepare parchment paper in advance to make removing and cutting the bars easier.
You can serve these bars with cold milk, some fresh strawberries, also with vanilla ice cream for a more special dessert.
Its Perfect For:
- Birthday parties
- Holiday dessert tables
- Potluck events
- Family movie nights
- Quick sweet cravings
Ingredients
For the Peanut Butter Layer:
- 2 cups graham cracker crumbs
- 1 cup creamy peanut butter
- 1/2 cup unsalted butter, melted
- 2 cups powdered sugar
- 1 teaspoon vanilla extract
For the Chocolate Topping:
- 1 1/2 cups semi-sweet chocolate chips
- 2 tablespoons creamy peanut butter
Kitchen Equipment You’ll Need
- Mixing bowls
- Measuring cups and spoons
- Spatula or wooden spoon
- 8×8-inch baking pan
- Parchment paper
- Microwave-safe bowl
- Refrigerator
How to Make No-Bake Reese’s Peanut Butter Bars
Step 1
Prepare the pan: Line an 8×8-inch baking dish with parchment paper, leaving some overhang on the sides for easy removal later. Lightly grease the paper if needed to prevent sticking.
Step 2
Make the peanut butter mixture: In a large bowl, combine the melted butter and creamy peanut butter. Stir until smooth and well blended. Add the powdered sugar, graham cracker crumbs, and vanilla extract. Mix thoroughly until the mixture becomes thick and evenly combined. It should look like a soft dough that holds together when pressed.
Step 3
Press into the pan: Transfer the mixture into the prepared baking dish. Use a spatula or the back of a spoon to press it down firmly and evenly across the bottom. Make sure the layer is compact and smooth for clean slices later.
Step 4
Prepare the chocolate topping: In a microwave-safe bowl, combine the chocolate chips and 2 tablespoons of peanut butter. Heat in 20–30 second intervals, stirring each time, until fully melted and smooth. Be careful not to overheat the chocolate.
Step 5
Spread the topping: Pour the melted chocolate mixture over the peanut butter layer. Spread it evenly using a spatula, making sure it covers the entire surface.
Step 6
Chill the bars: Place the dish in the refrigerator for at least 1–2 hours, or until completely firm. The bars should feel solid to the touch before cutting.
Step 7
Slice and serve: Once chilled, lift the bars out using the parchment paper overhang. Cut into squares or rectangles using a sharp knife. For clean cuts, wipe the knife between slices.
Tips for Best No-Bake Reese’s Peanut Butter Bars
- Use good-quality peanut butter.
Choose creamy peanut butter for smooth texture.
Natural peanut butter can work, but mix it well first. - Line your pan properly.
Use parchment paper for easy removal.
Leave extra paper on the sides to lift the bars out easily. - Press the base firmly.
Use the back of a spoon to press evenly.
This helps the bars stay strong and not crumble. - Melt chocolate slowly.
Heat in short intervals in the microwave.
Stir between each round to avoid burning. - Chill long enough.
Let the bars set in the fridge fully.
Do not cut them too early or they will break. - Use a sharp knife for cutting.
Wipe the knife after each slice.
This gives you clean and beautiful squares. - Store properly after making.
Keep them in an airtight container.
This keeps them fresh and soft.
Optional Ingredients
- Mini chocolate chips
- Sea salt flakes
- Chopped peanuts
- White chocolate drizzle
- Crushed Reese’s pieces
- Caramel drizzle
How to Serve No-Bake Reese’s Peanut Butter Bars?
I love serving these bars straight from the refrigerator because they taste best when they are cold and firm. When they are fully chilled, the chocolate layer stays smooth and shiny, and the peanut butter layer feels creamy and rich. You can cut them into small squares for parties or larger pieces for a more generous dessert. They look beautiful arranged neatly on a simple plate, especially when served fresh.
I also like to serve them with cold milk, warm coffee, or even tea. The sweet chocolate flavor pairs very well with simple drinks that are not too sugary. If you want to make the presentation more special, you can add fresh strawberries, banana slices, or a light sprinkle of powdered sugar on top. This makes the dessert table look more inviting and colorful.
I sometimes prepare these bars for gatherings and place each piece inside small paper liners. This makes them easy to grab and keeps serving simple and clean. They are perfect for birthdays, holidays, potlucks, and family dinners. Because they are rich, small portions are usually enough to enjoy their full taste.
Is No-Bake Reese’s Peanut Butter Bars Healthy?
These bars are a sweet dessert, so they should be enjoyed in moderation. They contain peanut butter, butter, sugar, and chocolate, which makes them high in calories and sugar. However, peanut butter provides some protein and healthy fats. If you eat a small piece, they can fit into a balanced lifestyle as an occasional treat.
Variations and Substitutions
- Dark Chocolate Version
Use dark chocolate instead of milk chocolate.
This reduces sweetness.
It creates a richer flavor.
Perfect for chocolate lovers. - Crunchy Peanut Butter
Replace creamy peanut butter with crunchy.
It adds texture to the base.
Gives a slightly nutty bite.
Still easy to prepare. - Gluten-Free Version
Use gluten-free graham crackers.
Check all ingredients carefully.
Safe for gluten-sensitive guests.
Taste remains delicious. - White Chocolate Topping
Use melted white chocolate instead.
It makes the bars sweeter.
Creates a bright appearance.
Very popular with kids. - Add Sea Salt
Sprinkle sea salt on top.
It balances the sweetness.
Enhances chocolate flavor.
Simple but elegant touch. - Caramel Layer
Add a thin caramel layer before chocolate.
Makes bars extra rich.
Adds soft chewy texture.
Great for special occasions. - Extra Protein Version
Add a scoop of protein powder.
Mix it well into the base.
Adjust sugar if needed.
Good for a higher-protein treat. - Oreo Crust Version
Replace graham crumbs with crushed Oreos.
Adds deeper chocolate flavor.
Makes bars more indulgent.
Fun twist for celebrations.
How to Store
Store the bars in an airtight container in the refrigerator. They will stay fresh for up to one week. Always keep them chilled to maintain firmness. If stacking layers, place parchment paper between them to prevent sticking. Proper storage keeps the texture smooth and tasty.
How to Reheat
These bars are best served cold, so reheating is not necessary. If you prefer a softer texture, leave one piece at room temperature for about 10–15 minutes before eating. Avoid microwaving because the chocolate layer may melt too much. They taste best slightly chilled.
Frequently Asked Questions About No-Bake Reese’s Peanut Butter Bars
Do I need to bake these bars?
No, this recipe is completely no-bake.
You only need to mix the ingredients and chill them.
The refrigerator helps the bars set and become firm.
Can I use natural peanut butter?
Yes, but you need to stir it very well first.
Natural peanut butter can separate easily.
Mix until smooth before adding it to the recipe.
How long should I chill the bars?
At least one to two hours in the refrigerator.
For best results, chill them longer if possible.
This helps the layers set properly and makes cutting easier.
Can I make this recipe ahead of time?
Yes, this dessert is perfect for making in advance.
You can prepare it one or two days before serving.
Just keep it covered and refrigerated until ready to eat.
No-Bake Reese’s Peanut Butter Bars Recipe
Course: DessertCuisine: AmericanDifficulty: EasyServings
16
barsPrep time
15
minutesChilling time
2
hoursNo-Bake Reese’s Peanut Butter Bars are simple, rich, and always satisfying. They are perfect when you want a homemade dessert without baking. With easy ingredients and a short preparation time, you can create a sweet treat that everyone will love.
Ingredients
- For the Peanut Butter Layer:
2 cups graham cracker crumbs
1 cup creamy peanut butter
1/2 cup unsalted butter, melted
2 cups powdered sugar
1 teaspoon vanilla extract
- For the Chocolate Topping:
1 1/2 cups semi-sweet chocolate chips
2 tablespoons creamy peanut butter
Directions
- Prepare the pan: Line an 8×8-inch baking dish with parchment paper, leaving some overhang on the sides for easy removal later. Lightly grease the paper if needed to prevent sticking.
- Make the peanut butter mixture: In a large bowl, combine the melted butter and creamy peanut butter. Stir until smooth and well blended. Add the powdered sugar, graham cracker crumbs, and vanilla extract. Mix thoroughly until the mixture becomes thick and evenly combined. It should look like a soft dough that holds together when pressed.
- Press into the pan: Transfer the mixture into the prepared baking dish. Use a spatula or the back of a spoon to press it down firmly and evenly across the bottom. Make sure the layer is compact and smooth for clean slices later.
- Prepare the chocolate topping: In a microwave-safe bowl, combine the chocolate chips and 2 tablespoons of peanut butter. Heat in 20–30 second intervals, stirring each time, until fully melted and smooth. Be careful not to overheat the chocolate.
- Spread the topping: Pour the melted chocolate mixture over the peanut butter layer. Spread it evenly using a spatula, making sure it covers the entire surface.
- Chill the bars: Place the dish in the refrigerator for at least 1–2 hours, or until completely firm. The bars should feel solid to the touch before cutting.
- Slice and serve: Once chilled, lift the bars out using the parchment paper overhang. Cut into squares or rectangles using a sharp knife. For clean cuts, wipe the knife between slices.