
Quick & Easy Recipes for Everyday Cooks
Welcome to Food By Ayaka!
12 Amazing Halloween Brownie Recipes
This Halloween, transform your kitchen into a spooky bakery with these 12 amazing brownie recipes. From classic chocolate brownies with festive decorations to creative designs straight from a haunted house, these treats are perfect for any celebration. Each recipe combines rich, fudgy brownies with fun Halloween themes everyone will love.
These brownie recipes range from simple designs for beginners to elaborate creations that will wow your guests. Whether you want cute ghost brownies, creepy graveyard scenes, or colorful candy corn layers, there’s something for every skill level. Most recipes use common pantry ingredients, making them perfect for last-minute parties.
Get ready to become the star of your Halloween party with these creative brownies that taste as good as they look. Each recipe includes detailed instructions for professional-looking results, even if you’re new to baking.
Classic Halloween Fudge Brownies
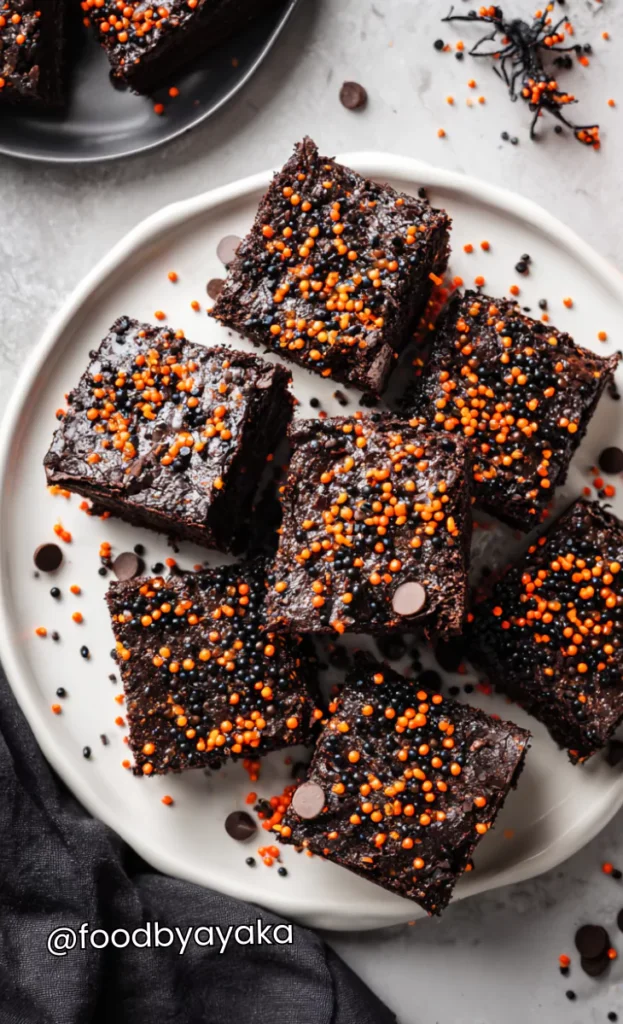
These rich chocolate brownies are decorated with orange and black sprinkles for a festive Halloween touch. The fudgy texture melts in your mouth while the colorful toppings add a fun, spooky twist that kids and adults love.
Time: 45 minutes | Servings: 16 brownies
Ingredients
- 1 cup unsalted butter
- 2 cups granulated sugar
- 4 large eggs
- 3/4 cup unsweetened cocoa powder
- 1 cup all-purpose flour
- 1/2 teaspoon salt
- 1 teaspoon vanilla extract
- 1 cup chocolate chips
- Halloween sprinkles for topping
Instructions
- Start by preheating your oven to 350°F (175°C) and line a 9×13-inch baking pan with parchment paper, leaving some overhang on the sides for easy removal later.
- Place the butter in a large microwave-safe bowl and melt it completely, which should take about 1-2 minutes on high power.
- Whisk the sugar into the melted butter until the mixture is well combined and slightly grainy in texture.
- Beat in the eggs one at a time, making sure each egg is fully incorporated before adding the next one, then stir in the vanilla extract.
- Sift together the cocoa powder, flour, and salt in a separate bowl, then gradually fold these dry ingredients into the wet mixture using a spatula until just combined.
- Fold in the chocolate chips gently, being careful not to overmix the batter, as this can make the brownies tough.
- Pour the batter into your prepared pan and spread it evenly to all corners using an offset spatula.
- Bake for 25-30 minutes until a toothpick inserted in the center comes out with just a few moist crumbs attached.
- Remove the brownies from the oven and immediately sprinkle Halloween sprinkles on top while they are still warm, so they adhere properly.
- Allow to cool completely in the pan before lifting out using the parchment paper and cutting into squares.
Spider Web Brownies
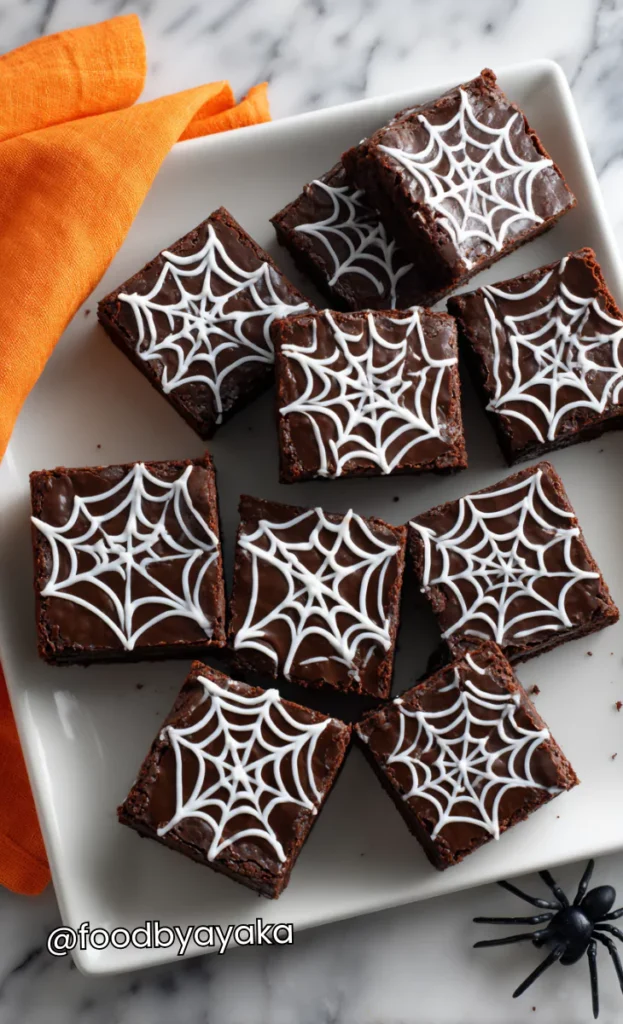
These brownies feature a stunning spider web design made with melted white chocolate on top of dark chocolate brownies. The contrast creates a spooky yet elegant dessert that’s perfect for Halloween parties and will impress your guests.
Time: 1 hour | Servings: 12 brownies
Ingredients
- 3/4 cup butter
- 1 1/2 cups sugar
- 3 eggs
- 1/2 cup cocoa powder
- 3/4 cup flour
- 1/4 teaspoon salt
- 1 teaspoon vanilla
- 4 oz dark chocolate, chopped
- 4 oz white chocolate for decoration
Instructions
- Preheat your oven to 325°F (165°C) and grease an 8×8-inch square baking pan thoroughly with butter or cooking spray.
- Melt the butter and dark chocolate together in a double boiler or microwave, stirring every 30 seconds until smooth and glossy.
- In a large mixing bowl, whisk together sugar and eggs for about 2 minutes until the mixture becomes pale and fluffy.
- Pour the melted chocolate mixture into the egg mixture and stir until well combined. Then, add the vanilla extract.
- Sift the flour, cocoa powder, and salt together, then gently fold them into the chocolate mixture using a rubber spatula until no flour streaks remain.
- Transfer the batter to your prepared pan and smooth the top with a spatula to ensure even baking.
- Bake for 35-40 minutes until the edges are set but the center still has a slight jiggle when you shake the pan gently.
- While brownies cool for 10 minutes, melt white chocolate in the microwave in 20-second intervals, stirring between each interval.
- Pour melted white chocolate into a piping bag or small plastic bag with the corner snipped off.
- Create concentric circles on top of the warm brownies with the white chocolate, starting from the center and working outward.
- Use a toothpick to draw lines from the center to the edges, creating a spider web pattern by dragging through the circles.
- Let cool completely until the white chocolate sets before cutting into squares with a sharp knife.
Pumpkin Swirl Brownies
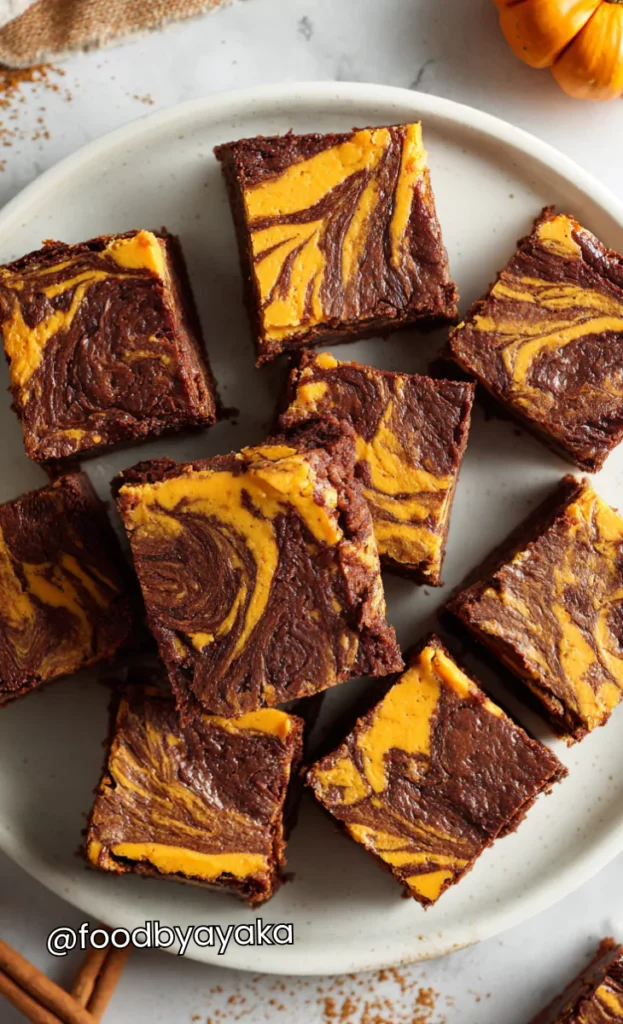
These brownies combine rich chocolate with creamy pumpkin cheesecake swirls for the ultimate fall dessert. The orange and brown marbled pattern looks beautiful and tastes like autumn in every bite with hints of warm spices.
Time: 1 hour 15 minutes | Servings: 16 brownies
Ingredients
- 1/2 cup butter
- 1 cup sugar
- 2 eggs
- 1/3 cup cocoa powder
- 1/2 cup flour
- 1/4 teaspoon salt
- 1/4 teaspoon baking powder
- 8 oz cream cheese, softened
- 1/3 cup pumpkin puree
- 1 egg
- 1/4 cup sugar
- 1/2 teaspoon pumpkin pie spice
Instructions
- Preheat oven to 350°F (175°C) and line an 8×8-inch pan with parchment paper, spraying lightly with cooking spray.
- For the brownie base, melt butter in a saucepan over medium heat until it begins to bubble slightly.
- Remove from heat and immediately stir in sugar until dissolved, then let the mixture cool for 5 minutes.
- Beat in 2 eggs and vanilla until the mixture is smooth and slightly thickened.
- In a separate bowl, whisk together cocoa powder, flour, salt, and baking powder until no lumps remain.
- Fold the dry ingredients into the wet ingredients until just combined, being careful not to overmix.
- Pour the brownie batter into the prepared pan and spread evenly to all corners.
- In a clean bowl, beat cream cheese with an electric mixer until fluffy and smooth, about 2 minutes.
- Add pumpkin puree, 1 egg, 1/4 cup sugar, and pumpkin pie spice, beating until completely smooth with no lumps.
- Drop spoonfuls of the pumpkin mixture over the brownie batter in a random pattern.
- Use a knife or skewer to create swirls by dragging through both batters in a figure-8 motion.
- Bake for 40-45 minutes until the center is just set and doesn’t jiggle when shaken.
- Cool completely in the pan before cutting, as the cheesecake layer needs time to firm up properly.
Graveyard Brownies
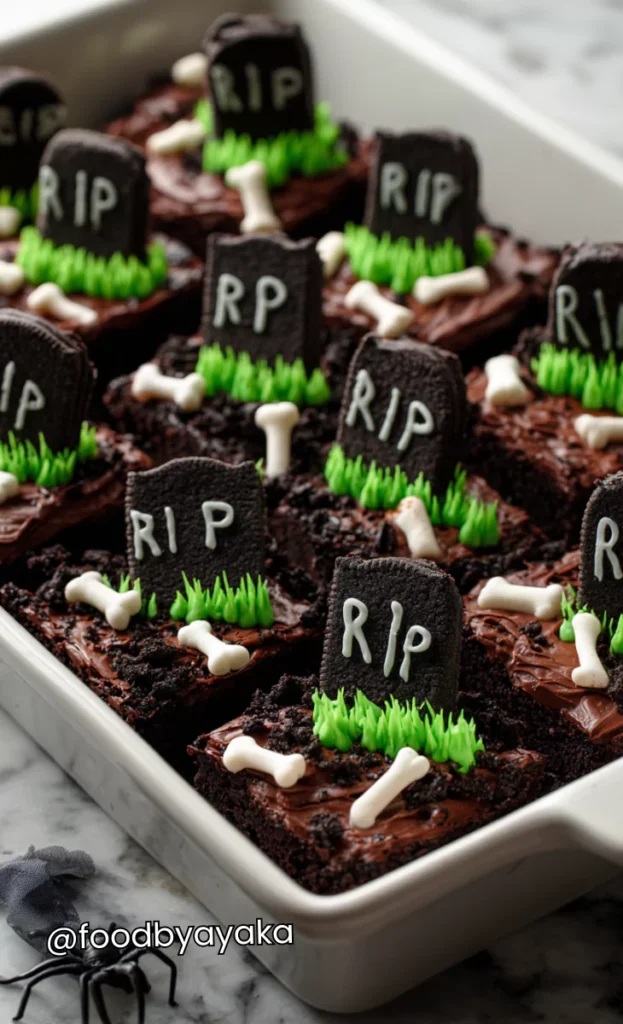
These spooky brownies are topped with cookie tombstones and candy bones to create an edible graveyard scene. Kids love helping decorate these fun treats that turn a simple brownie into a Halloween masterpiece.
Time: 1 hour 30 minutes | Servings: 12 brownies
Ingredients
- 1 cup butter
- 2 cups sugar
- 4 eggs
- 3/4 cup cocoa powder
- 1 cup flour
- 1/2 teaspoon salt
- 2 cups powdered sugar
- 3 tablespoons cocoa powder
- 4 tablespoons milk
- Oreo cookies (crushed)
- Milano cookies for tombstones
- Candy bones
- Green frosting
Instructions
- Preheat oven to 350°F (175°C) and line a 9×13-inch pan with parchment paper for easy removal.
- Melt butter in a large microwave-safe bowl, then whisk in sugar until the mixture is well combined.
- Add eggs one at a time, beating well after each addition until the batter is glossy.
- Sift together cocoa powder, flour, and salt, then fold into the wet ingredients until no streaks remain.
- Pour batter into the prepared pan and bake for 25-30 minutes until a toothpick comes out with moist crumbs.
- While brownies cool, make chocolate frosting by mixing powdered sugar, 3 tablespoons cocoa powder, and milk until smooth.
- Once brownies are completely cool, spread the chocolate frosting evenly over the top using an offset spatula.
- Crush Oreo cookies in a plastic bag using a rolling pin until they resemble dirt, then sprinkle over the frosting.
- Write “RIP” on Milano cookies using melted chocolate or frosting in a piping bag with a fine tip.
- Press the Milano cookie tombstones into the brownies, standing them upright at various angles.
- Place candy bones around the tombstones, pressing them gently into the frosting to secure.
- Use green frosting in a piping bag with a grass tip to create small tufts of grass around the graveyard.
- Refrigerate for 30 minutes to set all decorations before cutting and serving.
Monster Eye Brownies
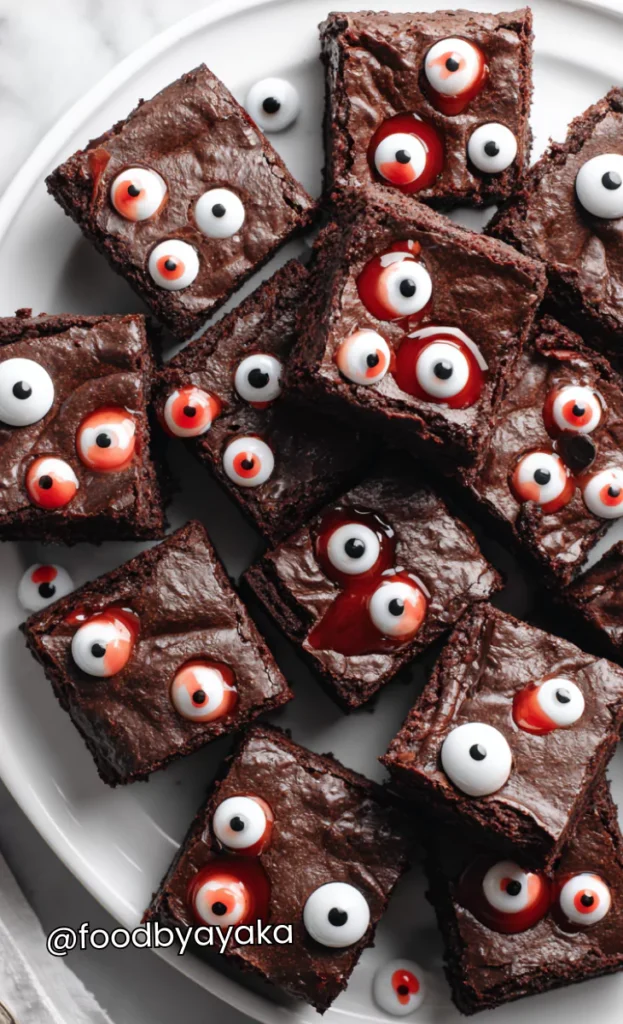
These creepy brownies feature candy eyes that seem to stare back at you from a dark chocolate base. The googly effect is both hilarious and spooky, making these perfect for Halloween parties where you want something fun.
Time: 50 minutes | Servings: 16 brownies
Ingredients
- 3/4 cup butter
- 1 1/2 cups sugar
- 3 eggs
- 1 teaspoon vanilla
- 3/4 cup cocoa powder
- 3/4 cup flour
- 1/2 teaspoon salt
- 1 cup chocolate chips
- Candy eyes (various sizes)
- Red gel icing
Instructions
- Preheat your oven to 350°F (175°C) and spray a 9×9-inch pan with cooking spray, then line with parchment.
- In a medium saucepan, melt butter over low heat, stirring constantly to prevent burning.
- Remove from heat and stir in sugar until the mixture is completely smooth and combined.
- Let the mixture cool for 5 minutes, then whisk in eggs one at a time, followed by vanilla extract.
- Sift cocoa powder, flour, and salt together in a bowl, removing any lumps with the back of a spoon.
- Gradually fold the dry ingredients into the chocolate mixture until just combined and no flour pockets remain.
- Stir in chocolate chips, distributing them evenly throughout the batter.
- Pour batter into the prepared pan and smooth the top with a spatula for even baking.
- Bake for 30-35 minutes until the edges are set but the center is still slightly soft.
- Remove from oven and immediately press candy eyes into the warm brownie surface in random patterns.
- Use different-sized eyes to create variety and make it look more interesting and creepy.
- Add red gel icing around some eyes to create bloodshot effects for extra spookiness.
- Let cool completely before cutting into squares, being careful not to disturb the candy eyes.
Witch Hat Brownies
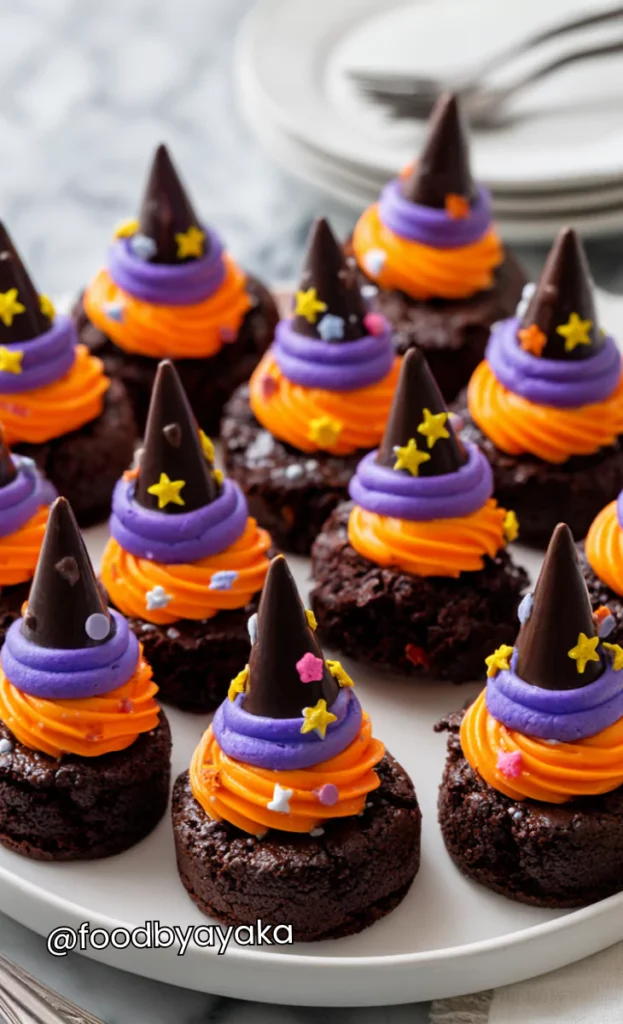
These brownies are topped with sugar cone witch hats decorated with colorful frosting and candy. Each brownie becomes an individual dessert that looks adorable and tastes delicious with the added crunch of the cone.
Time: 1 hour 20 minutes | Servings: 12 brownies
Ingredients
- 1/2 cup butter
- 1 cup sugar
- 2 eggs
- 1/3 cup cocoa powder
- 1/2 cup flour
- 1/4 teaspoon salt
- 12 sugar ice cream cones
- 2 cups melted chocolate
- Orange frosting
- Purple frosting
- Round cookies
- Candy decorations
Instructions
- Preheat oven to 350°F (175°C) and line a muffin tin with paper liners for individual brownies.
- Melt butter in the microwave, then stir in sugar until well combined and slightly grainy.
- Beat in eggs one at a time, making sure each is fully incorporated before adding the next.
- Sift together cocoa powder, flour, and salt, then fold into the wet ingredients until smooth.
- Divide batter evenly among the 12 muffin cups, filling each about 2/3 full.
- Bake for 18-22 minutes until a toothpick inserted in the center comes out with just a few crumbs.
- While the brownies cool, prepare the witch hats by dipping sugar cones in melted chocolate to coat completely.
- Place chocolate-covered cones on wax paper and refrigerate for 10 minutes until the chocolate hardens.
- Use orange and purple frosting to pipe decorative bands and buckles around each cone hat.
- Add small candy decorations like stars or dots to make each hat unique and colorful.
- Once brownies are cool, place a round cookie on top of each brownie as the brim of the hat.
- Attach the decorated cone on top of each cookie using a dab of melted chocolate as glue.
- Let everything set for 15 minutes before serving these adorable individual witch hat brownies.
Ghost Brownies
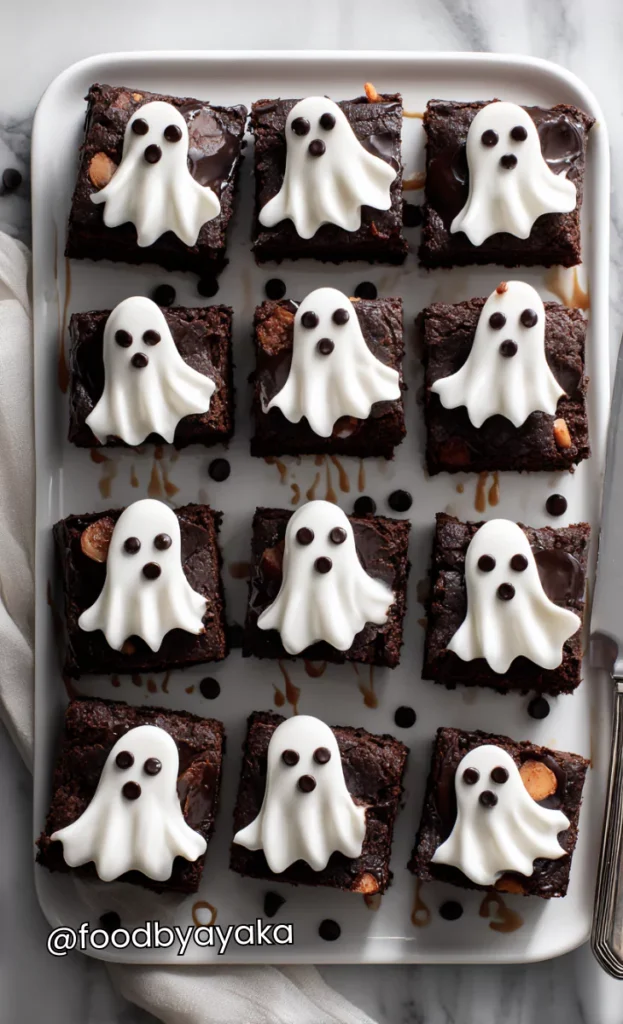
These brownies feature white chocolate ghosts floating on a dark chocolate background. The contrast is striking, and the ghosts can be made scary or cute depending on your decorating style.
Time: 1 hour | Servings: 16 brownies
Ingredients
- 1 cup butter
- 2 cups sugar
- 4 eggs
- 3/4 cup cocoa powder
- 1 cup flour
- 1/2 teaspoon salt
- 1 teaspoon vanilla
- 8 oz white chocolate
- Mini chocolate chips for eyes
- Black gel icing
Instructions
- Preheat oven to 350°F (175°C) and line a 9×13-inch pan with parchment paper, leaving overhang for lifting.
- Melt butter in a large bowl in the microwave, heating in 30-second intervals until fully melted.
- Whisk sugar into the melted butter until the mixture is well combined and slightly thick.
- Add eggs one at a time, beating vigorously after each addition to create a smooth batter.
- Stir in vanilla extract, mixing until evenly distributed throughout the batter.
- Sift cocoa powder, flour, and salt together, then fold into the wet ingredients until no dry pockets remain.
- Pour batter into prepared pan and spread evenly to all corners with a spatula.
- Bake for 25-30 minutes until the surface looks set and a toothpick comes out with moist crumbs.
- Let brownies cool completely in the pan while you prepare the ghost decorations.
- Melt white chocolate in the microwave in 20-second intervals, stirring between each until smooth.
- Pour melted white chocolate onto parchment paper and spread into ghost shapes using a spoon.
- While the chocolate is still wet, press mini chocolate chips in for eyes and use black gel for mouths.
- Refrigerate ghosts for 15 minutes until firm, then carefully peel off and place on cut brownie squares.
Candy Corn Brownies
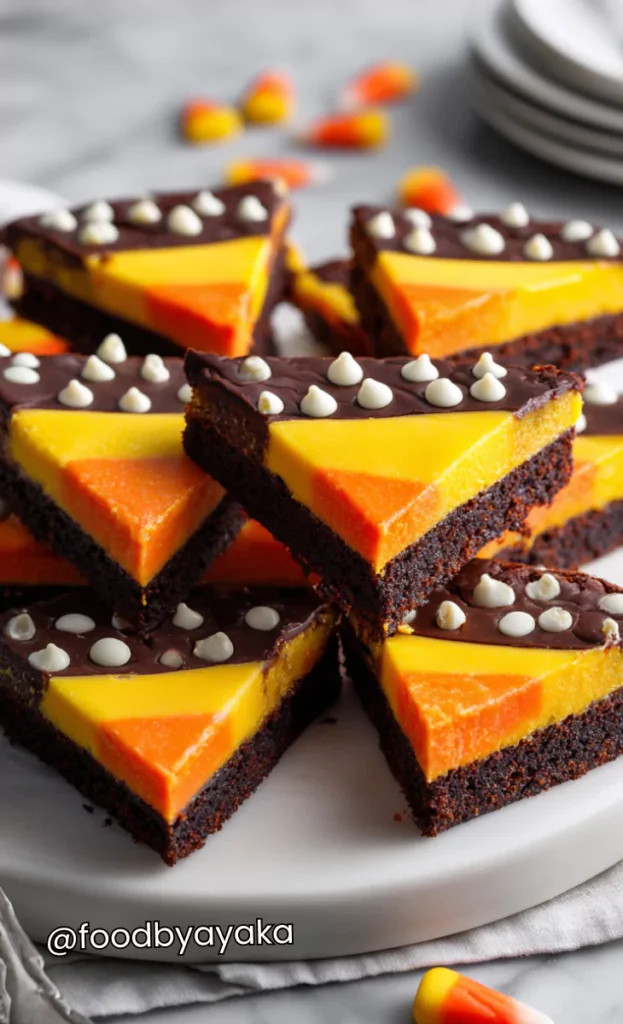
These festive brownies are layered in orange, yellow, and white to mimic candy corn colors. The tri-colored layers make each slice look like a piece of candy corn and taste like chocolate heaven.
Time: 2 hours | Servings: 16 brownies
Ingredients
- 1 1/2 cups butter
- 3 cups sugar
- 6 eggs
- 1 cup cocoa powder
- 1 1/2 cups flour
- 3/4 teaspoon salt
- Orange food coloring
- Yellow food coloring
- 1 cup white chocolate chips
Instructions
- Preheat oven to 350°F (175°C) and line a 9×13-inch pan with parchment paper sprayed with cooking spray.
- Make the base brownie batter by melting butter and mixing it with sugar until well combined.
- Beat in eggs two at a time, mixing well after each addition until batter is smooth.
- Sift together cocoa powder, flour, and salt, then fold into the wet ingredients until just combined.
- Divide the batter equally into three separate bowls, weighing for accuracy if possible.
- Leave one bowl plain for the chocolate layer, and add orange food coloring to the second bowl, mixing until evenly colored.
- Add yellow food coloring to the third bowl, stirring until you achieve a bright yellow color.
- Pour the orange batter into the prepared pan first, spreading it evenly to create the bottom layer.
- Carefully spoon the yellow batter over the orange layer, using an offset spatula to spread gently without mixing.
- Bake this double layer for 15 minutes until just beginning to set on top.
- Remove from the oven and carefully spread the plain chocolate batter as the final layer.
- Return to the oven and bake for an additional 25-30 minutes until fully set.
- While still warm, sprinkle white chocolate chips on top to represent the white tip of candy corn.
- Cool completely before cutting into triangular pieces to resemble candy corn shapes.
Mummy Brownies
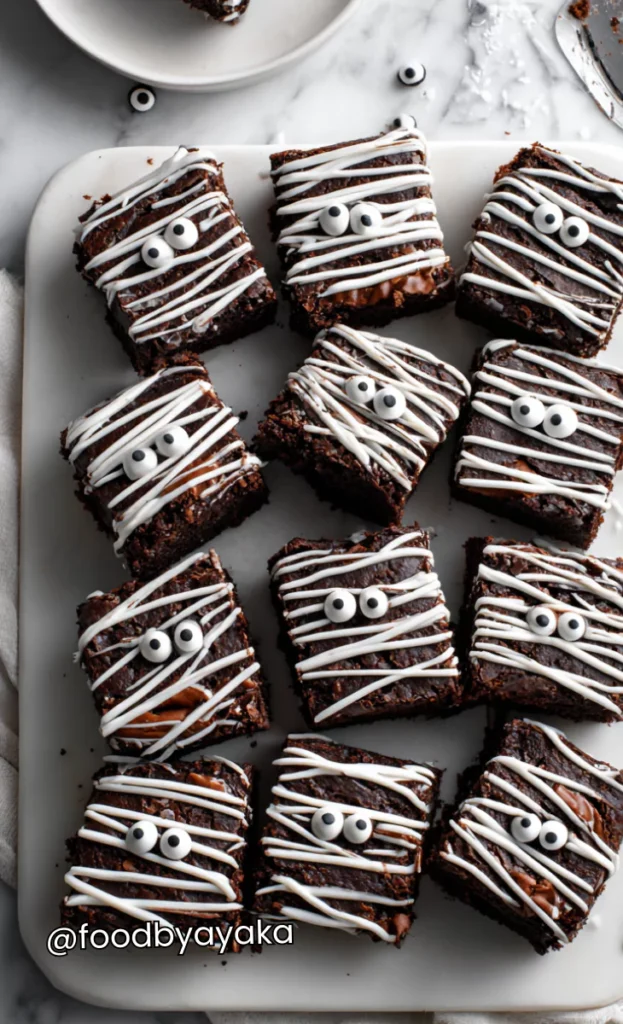
These brownies are wrapped in white chocolate drizzle to look like mummy bandages. Two candy eyes peek out from the wrapping, creating an adorable yet spooky Halloween treat that everyone will love.
Time: 1 hour | Servings: 12 brownies
Ingredients
- 3/4 cup butter
- 1 1/2 cups sugar
- 3 eggs
- 3/4 cup cocoa powder
- 3/4 cup flour
- 1/2 teaspoon salt
- 6 oz white chocolate
- 24 candy eyes
- 1 tablespoon coconut oil
Instructions
- Preheat oven to 350°F (175°C) and line a 9×9-inch pan with parchment paper for easy removal.
- Melt butter in a saucepan over medium heat, then remove from heat and stir in sugar.
- Let the mixture cool for 5 minutes, then whisk in eggs one at a time until glossy.
- Sift cocoa powder, flour, and salt together, removing any lumps with a fork.
- Fold dry ingredients into the chocolate mixture until just combined with no flour streaks.
- Pour batter into prepared pan and smooth the top with a spatula for even baking.
- Bake for 30-35 minutes until a toothpick inserted in the center comes out with just a few crumbs.
- Cool completely in the pan, then cut into rectangular pieces for individual mummies.
- Melt white chocolate with coconut oil in the microwave, stirring every 20 seconds until smooth.
- Transfer melted white chocolate to a piping bag or plastic bag with a corner cut off.
- Drizzle white chocolate back and forth across each brownie to create mummy bandage patterns.
- Leave a gap near the top of each brownie and place two candy eyes in the space.
- Let the white chocolate set at room temperature for 20 minutes before serving.
Blood Drip Brownies

These dramatic brownies feature red raspberry sauce dripping down like blood for a gory effect. The sweet and tart raspberry perfectly complements the rich chocolate, making these as delicious as they are scary.
Time: 1 hour 15 minutes | Servings: 16 brownies
Ingredients
- 1 cup butter
- 2 cups sugar
- 4 eggs
- 3/4 cup cocoa powder
- 1 cup flour
- 1/2 teaspoon salt
- 1 cup fresh raspberries
- 1/2 cup sugar
- 2 tablespoons water
- 1 tablespoon cornstarch
- Red food coloring
Instructions
- Preheat oven to 350°F (175°C) and prepare a 9×13 inch pan with parchment paper and cooking spray.
- Melt butter completely in the microwave, then whisk in 2 cups sugar until well combined.
- Beat in eggs one at a time, ensuring each is fully incorporated for a smooth batter.
- Sift together cocoa powder, flour, and salt, then fold into wet ingredients until just combined.
- Pour batter into prepared pan and bake for 25-30 minutes until set but still slightly fudgy.
- While brownies cool, make the blood sauce by combining raspberries, 1/2 cup sugar, and water in a saucepan.
- Cook over medium heat, mashing the raspberries as they soften, for about 5 minutes.
- Mix cornstarch with a tablespoon of water to create a slurry, then stir it into the raspberry mixture.
- Continue cooking for 2-3 minutes until the sauce thickens to a syrup consistency.
- Strain the sauce through a fine mesh sieve to remove seeds, pressing solids with a spoon.
- Add a few drops of red food coloring to make the sauce look more like blood if desired.
- Let the sauce cool slightly until it’s thick enough to drip slowly but not run everywhere.
- Cut brownies into squares and drizzle the blood sauce from the top edge, letting it drip down naturally.
- Serve immediately or refrigerate until ready to serve for the best visual effect.
Jack-o’-Lantern Brownies
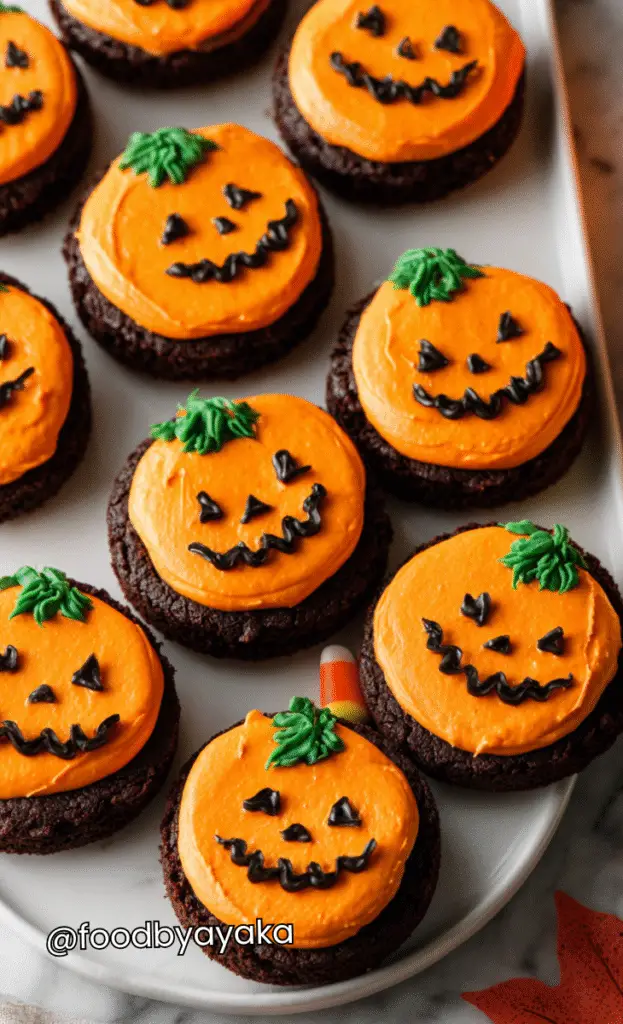
These brownies are cut into circles and decorated with orange frosting and chocolate faces. Each one looks like a mini pumpkin with a different jack-o’-lantern expression, making them perfect for Halloween parties.
Time: 1 hour 30 minutes | Servings: 12 brownies
Ingredients
- 3/4 cup butter
- 1 1/2 cups sugar
- 3 eggs
- 3/4 cup cocoa powder
- 3/4 cup flour
- 1/2 teaspoon salt
- 2 cups powdered sugar
- 1/2 cup butter, softened
- 3 tablespoons milk
- Orange food coloring
- Melted dark chocolate
- Green frosting for stems
Instructions
- Preheat oven to 350°F (175°C) and line a 9×13 inch pan with parchment paper for easy lifting.
- Melt 3/4 cup butter in a large microwave-safe bowl, then stir in sugar until combined.
- Add eggs one at a time, beating well after each addition to create a smooth, glossy batter.
- Sift cocoa powder, flour, and salt together, then fold into the wet mixture until no dry spots remain.
- Pour batter into prepared pan and spread evenly, then bake for 25-30 minutes until set.
- Cool brownies completely in the pan, then use a round cookie cutter to cut out circles.
- Make orange frosting by beating softened butter until fluffy, about 3 minutes with an electric mixer.
- Gradually add powdered sugar, beating continuously until light and fluffy.
- Add milk one tablespoon at a time until you reach spreading consistency, then mix in orange food coloring.
- Spread orange frosting smoothly over each brownie circle using an offset spatula.
- Pour melted dark chocolate into a piping bag with a fine tip or a small plastic bag.
- Draw jack-o’-lantern faces on each orange-frosted brownie with different expressions for variety.
- Use green frosting to pipe small stems on top of each pumpkin brownie.
- Let the decorations sit for 20 minutes before serving or storing in an airtight container.